![]()
Flash By The Numbers
Greetings to all us Flashers (er, sorry Flash Freaks if you so prefer)! In past columns on this subject we learnt about Flash's cool interface and how to begin drawing with it. This week we continue with animating those drawings.
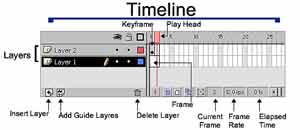
But wait, before we begin let me define what animation means. Animation is a simulation or illusion of movement created by displaying a series of pictures or frames. Frames are the rectangular areas in which text or graphics can appear. Frames appear in a timeline which represents changes in content over time. Multiple layers are used for organising the data.
Think of these layers as transparent sheets of acetate stacked one on top of each other. Where there is nothing on a layer, you can see clear through it to the layers below. Layers help you organize the artwork in a movie. You can then draw and edit artwork on one layer without affecting the content on another layer.
Flash Animations are basically of two types: Frame and Tweened. In the fromer (frame by frame), we have to add and change objects one by one. And each frame that carries a change or an instance of change and action is referred to as a keyframe. Keyframes are frames where you specify changes in the animation properties. And appear as circles in a regular frame. A keyframe for a layer that contains no graphics is blank. When a movie is run the frames displayed at a particular rate known as fps (frames per second). This the rate at which the movie plays back each frame giving an illusion of movement.
 Tweened
animation is an essential technique for creating movement and change in
a movie while minimizing file sizes. You can make an object move across
the Stage, change its size, rotate it, change the color and even change
the shape. Tweened animation lets you create Keyframes at important points
in the Timeline. This lets Flash create the frames in between.
Tweened
animation is an essential technique for creating movement and change in
a movie while minimizing file sizes. You can make an object move across
the Stage, change its size, rotate it, change the color and even change
the shape. Tweened animation lets you create Keyframes at important points
in the Timeline. This lets Flash create the frames in between.
Now supposing you want an object in the work area to move from its current position A to B. First, the image you tween in a motion tween must be a symbol or group. Choose Insert|Convert to symbol and then choose the graphics radio button from the behaviors and name your symbol. Then use the Arrow tool to drag the object from a position to B position. Click on the first frame and choose
Insert > Create Motion Tween. Last not the least choose Control > Rewind and then Control > Play. Wow!! You have yourself an animation running.
Tweening size and rotation You can use motion Tweening not only to create motion but also to change the size of a group or symbol, or to make it rotate. By creating multiple Keyframes. For example you have a cricket ball on frame 1. Select Frame 30 in the same layer and choose Insert > Keyframe. Notice that selecting the frame also selects the contents of that frame on the Stage. Thus, the change you make in the next step applies to the selected object. Choose Window > Panels > Transform. Enable Constrain and enter 200 for Scale and 180 for Rotate, then press Enter. Select frame 1 in the object layer and choose Insert > Create Motion Tween and then choose Control > Play. You have an animation of rotating ball similarly you can change the color, shape and many more aspects of an object, providing your animation with a real cool look.
Readers who have missed the previous columns can check past Product Guides in the Archives section of IT@TT Onlineat www.careermosaicindia.com/itattt.
Vaishali
Singh
[email protected]
Other Articles
CareerCorner
| ChiefChat
| FirstFolio|
Mailbox
| ProductGuide
| ProductReview
SiteScan
|
Techtalk
| VirusWatch
| Webware